Published August 17, 2023 | Updated August 17, 2023
By Dr Tirth Vasa
Tirth is a ST4 Anaesthesiologist (MTI Trainee) based in Southern Yorkshire, from Mumbai, India. He runs a group which guides candidates for the FRCA examinations and offers guidance for other pathways into the NHS for the novice IMG. Writing is his passion whenever he is not eating.
Often, I have seen the sincerest of doctors struggling with intravenous cannulation, including myself, in the wards or ITUs. You may have mastered the basics taught in medical school, but these fly out of the window when dealing with an apprehensive patient!
My guide is restricted to a few pointers which I have adhered to, over my years as an anaesthetist. These all give me the best chance of success.
I will not be covering the basics of the procedure. This article assumes that you are trained in choosing the correct equipment for the procedure. I will also avoid covering sterility, hospital policies and of course, taking informed consent – I assume you know this already.
Dealing with Difficult Cannulation and IV Access
Although there is no consensus or universally accepted definition, difficult IV access is commonly defined as either:
- Two plus failed attempts by an experienced operator using landmark-based vein visualisation or palpation.
- The need for rescue methods such as ultrasound, central venous cannulation, or vein-finder devices.
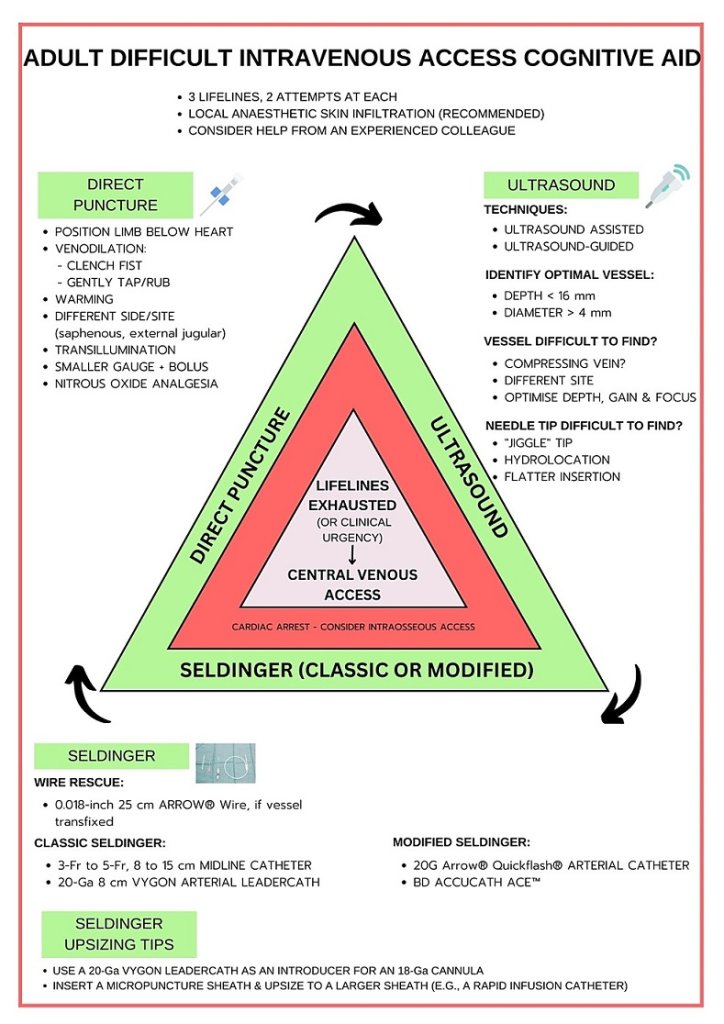
I always keep a cut-off of 2 attempts before calling a senior operator for help, do not be shy to ask for help.
Other “tricks of the trade” are largely relegated to case series, letters to the editor, and non-published content like blog posts and tweets.
Here are my best tips.
1. Communicate!
It has been a long OT day when we anaesthetists are referred to a difficult cannulation by ward nurses or doctors. Usually, the patient has been poked and prodded multiple times, by multiple strangers, in the hopes of not avoiding calling us to the ward.
We take a momentary break from our OT cases and run hurriedly to the wards. On arrival, we find an uncooperative patient who is fed up and unwilling to listen to another stranger.
This is a familiar situation, which I am sure many of you would already have faced. What is imperative, is to first COMMUNICATE.
Communicate with the referring team/unit.
Ask about the need for an IV and what medications need to be administered. Often, I have found that the patients are due to be discharged the next day, and since the ward round was delayed, the medications have not been converted to tablets. If the ward team hasn’t communicated the plan, the attending nurse won’t be able to tell you!
It also helps in creating space for discussion with the parent team regarding options IF the procedure failed. You can also discuss limiting your number of attempts and of course, find out the size of the cannula you are supposed to insert.
Generally, IV TPN formulations/electrolyte supplementation like Potassium are irritants to the veins. Hence, I would prefer inserting an 18G cannula for long-term usage in a large calibre or central vein.
Communicate with the patient!
Talk to them in a reassuring tone, and always listen to their story with empathy!
I often keep a tourniquet applied and then talk to them about their mental and physical well-being, which gives me a time buffer to dilate the veins!
Communicate with the nurse.
They know the patient as they have spent many shifts with them.
Ask them to show you:
- Sites of previous attempts
- Any areas of thrombophlebitis/thrombosis
- Any possible venous access sites
2. The Tourniquet is Your Friend – Equipment Check!
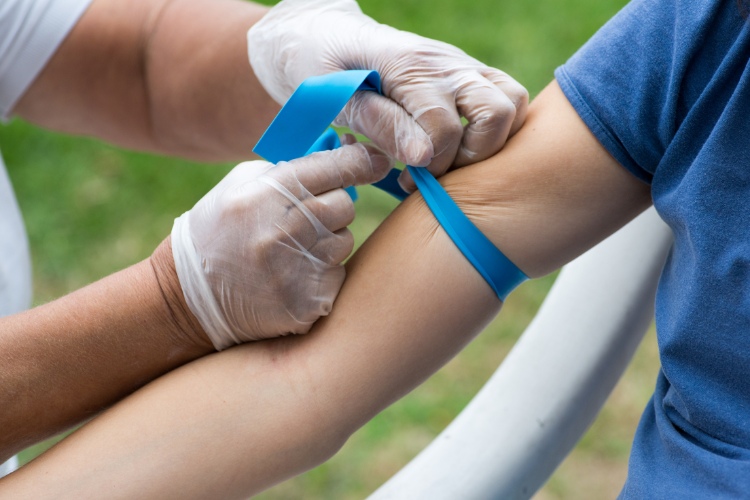
The tourniquet should be tightened to supply pressure to the extremity, at least 5 m proximal to the puncture site. The dilatory effect of tourniquet application is caused by an increased local venous pressure.
In difficult access, always secure the tourniquet pre-emptively at least 10 minutes prior to attempted cannulation on the limb. Do keep a note of the time of application as you do not want the patient’s limb to develop ischemia.
Keep all the equipment backup ready, which can include portable vein imaging devices and an ultrasound machine. Both devices may be found in your department, though you can consider purchasing a portable vein-finder.
Here are a few cheap(er) personal vein-finders available on Amazon. Purchase at your own risk – most reviews report that these devices only visualise peripheral veins!
- Illumivein – Inexpensive FDA-approved device
- Oreq Vein Finder Viewer – inexpensive, but few reviews and only 3.1 stars.
- HG Vein Finder – Mid-range with good (albeit limited) reviews
- Respironics Wee Sight – Often recommended for neonatal cannulation
- Veinlite EMS PRO – More expensive at over £300, but better reviews
You could also try out the VeinSeek Pro app for Android or iOS.
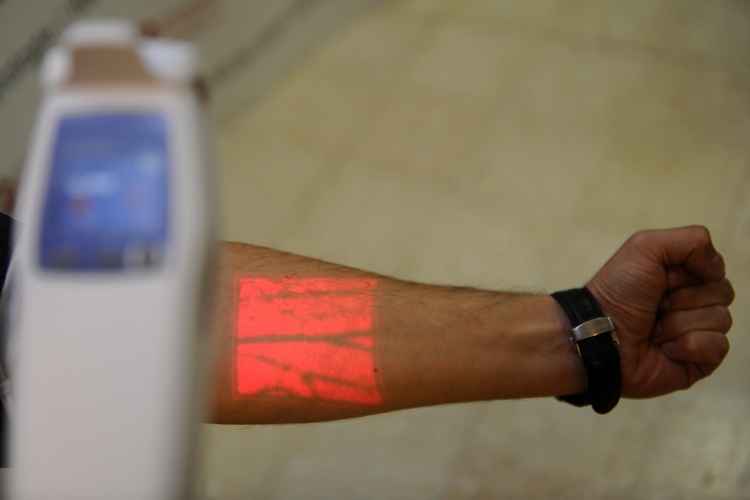
How a vein visualiser displays peripheral veins.
These portable vein finder devices help to illuminate veins which are normally invisible to the naked eye, in a semi-dark room. You will need some assistance from nursing staff or a colleague.
There is no probe or transducer so both of your hands are free to deal with venous access. Considering these characteristics, VeinViewer might prove effective in locating superficial veins to be punctured, cannulated, or both.
3. Using Ultrasound-Guided Cannulation
If you’re unfamiliar with using a portable ultrasound, try looking for an ultrasound course, or asking a senior to help out.
Traditionally, most practitioners scan proximally to the antecubital fossa when attempting ultrasound-guided access. Consider looking distally while utilising a shorter and smaller gauge needle.
This approach allows for vessel preservation by not injuring more proximal veins. Smaller gauge needles can often provide adequate resuscitation capabilities (i.e. a 20 gauge needle can infuse 3,900 ml per hour).
You must have a general basic knowledge regarding the selection of the transducer and preset, such as:
- Image orientation
- Basic image optimization
- Distinguishing veins versus arteries
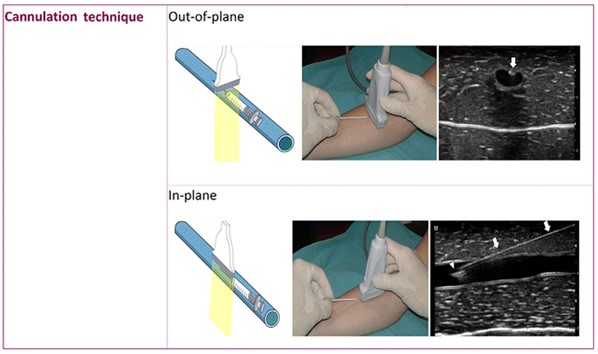
- Managing techniques of cannulation (out-of-plane and in-plane techniques).
To master these techniques, you can ask a senior to show you or attend an ultrasound-guided cannulation course.
Vein selection should include veins which are fully compressible, without any thrombus in the walls.
I also use some mathematics prior to performance (these give me a basic idea of expected venous contact):
- Selection of Catheter: AP diameter (mm) = maximum Fr catheter size. E.g. if the AP diameter is 4 mm = a max 4F catheter can be accommodated.
- Real distance to reach the vein (45° insertion angle): 1.4 × vertical distance.
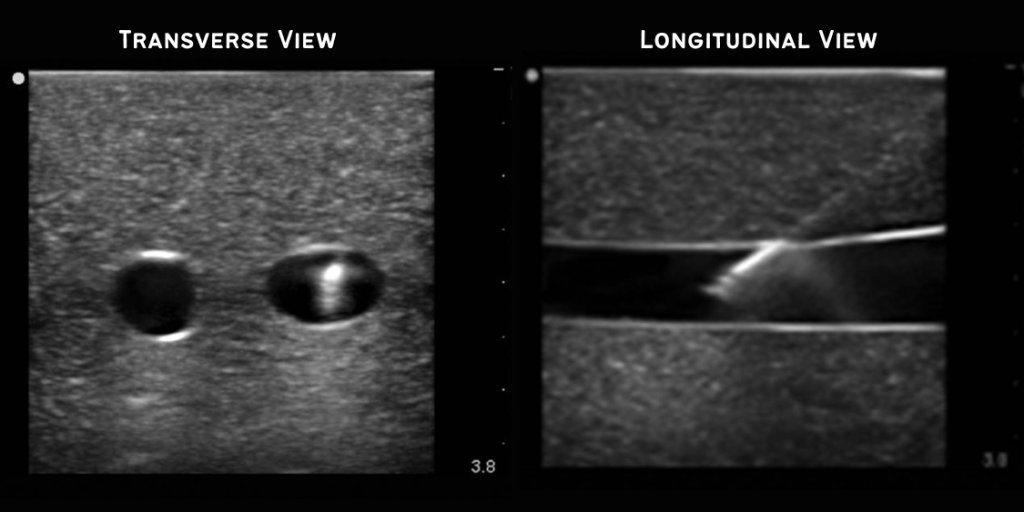
The short-axis (transverse, cross-sectional) view usually is preferred because it is easier to obtain. It is also the best view for identifying veins and arteries and their orientation to each other.
However, the transverse view shows the needle only in cross-section (hyperechoic [white] dot). The needle tip can be distinguished only by the appearance and disappearance of the white dot as the imaging plane traverses past the needle tip.
4. Cannulation Manoeuvres
There is evidence available online, which recommends the use of a blood pressure cuff rather than a tourniquet for individuals with sensitive/fragile veins and those with a risk of difficult venous access. It is suggested to inflate the manometer to the level of the individual’s diastolic blood pressure.
To make the veins fuller for easier vein determination, you can also try:
I have even covered a patient in a warming blanket with a Bair Hugger, with the temperature set to 45 degrees to cause generalised vasodilation. This can be done approx. 5 minutes before the procedure.
Make sure the bevel of the needle faces upwards as this is the sharpest part of the needle. Believe me; the needle will glide easily if inserted this way.
Here is more information on specific techniques:
Tapping the Veins
Tapping the veins releases powerful vasodilators in the local circulation such as histamine and nitric oxide from the endothelium, along with substance P. However, do not tap too hard or the vessels will go into autonomic system-related vasospasm.
Using Swabs and EMLA
Always apply a chlorhexidine/alcohol swab multiple times beforehand to irritate the skin. This causes localised vasodilation along with disinfection benefits. Rub this in the direction of the venous flow to improve the filling of the vein by pushing blood past the valves. My personal preference leans towards 2% chlorhexidine in 70% alcohol wipes, wiped for 30 seconds and left to dry.
Topical application of nitroglycerin ointment alone, or with EMLA cream, is a safe and effective way to induce local vasodilation. This often improves the visibility of the veins of the hand and ease of cannulation.
Patient Maneuvers
Asking the patient to do a forced expiration increases the diameters of the capacitance vessels due to a rise in intrathoracic pressure. Wait for 10-15 seconds following the manoeuvre.
Instruct the patient to clench and unclench their fist to compress distal veins and distend them; this helps in the venous filling.
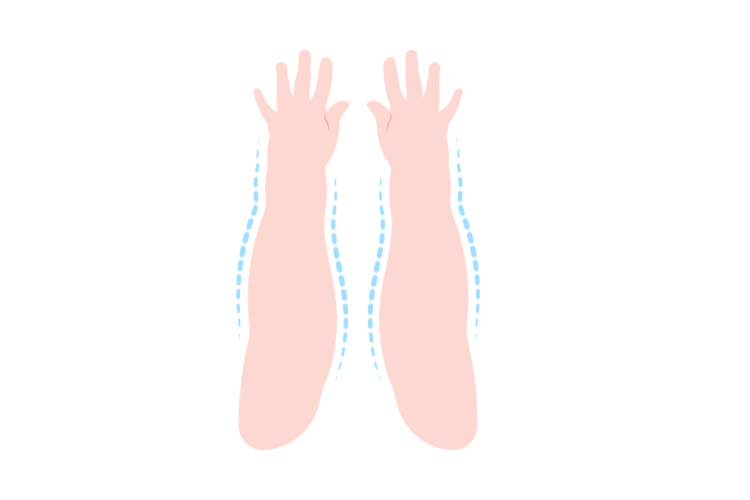
Peripheral Oedema
Patients with peripheral oedema present a particular challenge in visualising and palpating suitable veins.
In these patients the oedema can be compressed for a minute, driving the interstitial fluid elsewhere. This will help the veins come into view.
5. Vein Selection
ALWAYS ask the nurse and the patient themselves regarding possible sites of ‘easy’ veins. I have had chemotherapy patients guiding me to the veins which were unspoilt by chemotherapeutic drugs!
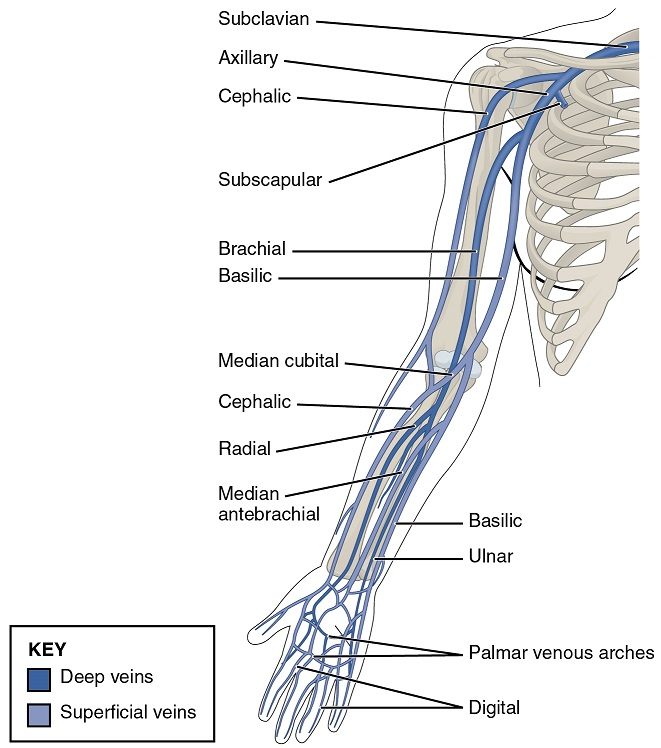
The IV entry site should be as distal as possible, and each attempt should be further advanced proximally gradually. A distal-to-proximal strategy saves proximal sites and reduces the risk of extravasation from vesicant infusions.
As veins tend to be relatively fixed where they converge, we should identify these convergences and puncture from sideways to minimise vein-rolling. Pulling the skin taut and providing traction can help prevent the skin from folding up and dislodging the vein when advancing the needle. Ask for help in case of obese patients or oedematous patients.
The Best Veins for Difficult Cannulation
Cephalic Vein
One of the best veins is the cephalic vein. Interventional radiologists use this frequently!
The Ventral Forearm or Wrist
This area is often overlooked.
The inside of the wrist is a tender area (be prepared for sharp winces from the patient!) with small branching veins that only would be able to take thin cannulae.
External Jugular Cannulation
I have often been called to the ED to place external jugular (EJV) lines. An important caveat to note is that the EJV is a thick dilated vein able to accommodate even 16-18G catheters but is still a peripheral vein. This requires a very shallow approach (<5 degrees), with constant ‘uplift’ on the vein as soon as you feel that you pierced the wall.
You will need an assistant to aid you by placing their finger along the superior border of the clavicle at the lower end of the vein, with a skin stretch. This engorges the proximal portion of the vein.
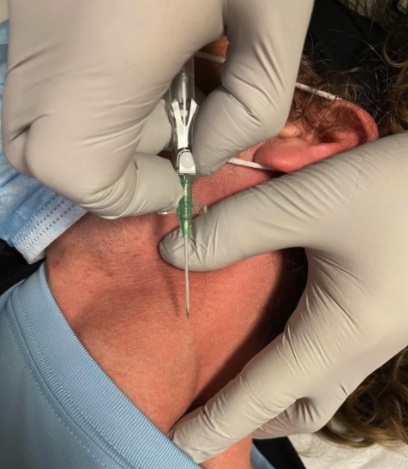
Great Saphenous Vein
Leg and foot veins should be avoided as much as possible due to the risk of lower extremity embolism involved. However, the great saphenous vein is your friend! It is quite superficially situated above the medial malleolus with a wide diameter, often easily palpable if not seen.
6. Cannula-Related Complications
I have encountered many doctors who continuously keep on using the same cannula over and over, without understanding the need of using a fresh cannula!
Nearly 40% of procedures are terminated early due to complications such as dislocation and infiltration.
Dislocation is when the catheter loses access to the patient’s vasculature and causes a forced, premature interruption of infusion therapy. Infiltration, on the other hand, occurs when punctures do not properly target the vascular access and cause the infused solution to flow into the tissue surrounding the vascular access.
Step back and examine the cannula after each attempt and flush it with saline to prevent most of these complications.
As a side note, recommendations to bend IV needle catheters about 15 degrees to aid the placement of the IV catheter into a vein could do more harm than good.
Since the passage of the Needlestick Safety and Prevention Act of 2000 (US legislation), most of the IV catheters used in the developed world today have safety mechanisms to cover the needle after use to prevent needlestick injuries.
Bending the needle in the IV catheter can disable the safety mechanism before the IV catheter is even placed. Plus, if bent too far, the needle could also kink or break, presenting potential complications to the procedure or an increased hazard to the patient.

Sometimes a cannula cannot be advanced into the vein despite flashback into the cannula for two reasons:
- The cannula is against the sidewall of the vein and the vein is not completely straight.
- Cannula is up against the valve of the vein.
A tip is to ensure that the cannula tip is retracted while the needle is in the vein, and then lift the needle up parallel to the skin and try advancing the cannula again. This should work most of the time.
Flushing the cannula with saline does not usually work, though you may be able to “float” the cannula through the valve if you are sure that the benefits outweigh the risks of potentially causing damage to the vein or valve.
7. Optimising Your Ergonomics & Patience
Make yourself comfortable and relax your shoulders – the worse your position, the lower your success rate. Sitting is ideal and preserves your back too.
Check everything, including the bandage and fresh cannulae for if you miss. This allows you to quickly move between attempts and reduces the stress of the whole affair. Veins can sense your exasperation and will automatically vanish.
Don’t shine a bright light on the skin. The veins will go into hibernation. It’s better to tilt the hand 90 degrees to the ambient sunlight. You will see shadows that will show where the vein raises the skin.
NEVER hurry. I have seen practitioners that are so excited by hitting the vein and getting that flashback that they try drawing back the needle from the cannula immediately. Doing this prematurely might blow the vein if you’ve only just hit the top of the wall without entering the vessel.
ALWAYS be patient with the small 22 & 24G cannulae. It takes a moment for the blood to track up the cannula and indicate the correct placement. The pause is gold!
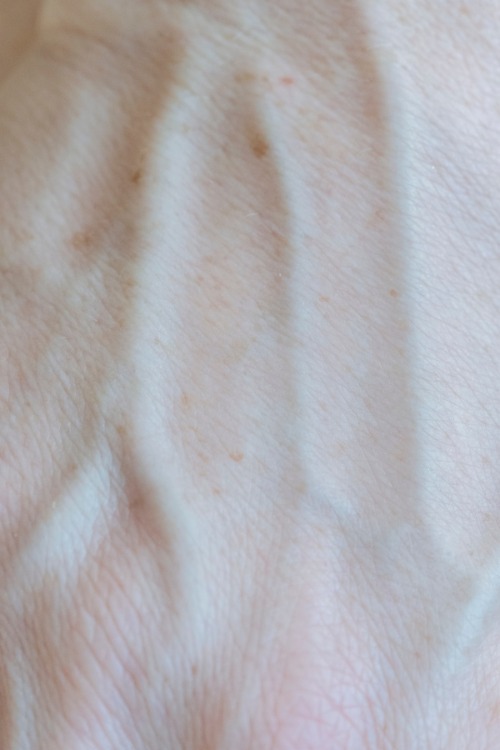
In the small veins, it takes an eternity for that flashback to present itself, something akin to the surgeon making their way to the operating theatre. I use this trick all the time – flick the back of the cannula off (I think this only works with a non-safety cannula), then flush the whole needle hub with some saline. Only the hub behind the needle should be loaded with saline. Then, when you’re cannulating, the second you hit the vein you will see a ‘blush’ in the colour of the saline, followed by a thin ribbon of blood coming through.
8. Be Prepared For Failure!
We all miss veins. It happens.
Whether it’s down to a faulty method or just a bad vein, no one is successful 100% of the time. Let the losses go and be confident with the next attempt. If given the opportunity, attempt every IV you can. The more you try, the more skilled you will be.
Finally, always keep your IV whisperers/experts ready as backups. It never hurts to call for help and ask seniors!


